Welcome to my classroom, let's take a look around the space my new firsties will be learning in this year! Heads up: This is a LONG post with a ton of PHOTOS! Get your popcorn ready! :)
Side note: You will notice two teacher's names on things and no math or science materials, this is because we team teach & I only teach ELAR & SS!
Once the students enter the classroom they have a little info center. It has our calendar, I put up birthdays & special days once the year begins! They can also quickly check the which activity we will be going to, put away their daily folder, & grab their name tag from the boys or girls hook.

We wear name tags for the first three weeks so all school staff can quickly see students names. After that, I keep them around for field trips, subs (if they want), and special events where we may be splitting up. The empty white box is my "drop box" notes from home, forms for the office, and any sweet little colorings go in this box which I check during my conference period each day (in reality, while we line up for specials, so I only have to make one trip out of my classroom during planning!). It works wonders, no piles of things on my desk, no losing important papers, & it even trains sweet people like PTA to check here for box tops, donations, & forms instead of interrupting my lesson. Its easier for everyone! {The backpack on the door is for fire drills with 911 supplies, the rolled up weird thing in the corner is a huge map that only comes out for special lessons.}

Continuing down this wall, this is my student supply area. Everything they need is located in this area and I explicitly teach procedures for getting supplies when needed.
Sharp & broken pencil cups..you already know how this works! The crayon container is a freebie in my TPT shop, its super simple, I didn't want 12 different drawers taking up space, so I combined into one, its perfect for me! Click the picture to download the labels.
The way the lost/extra crayon organizer works is brilliant & has nothing to do with me (perf). Each of my tables has 5 desks so 5 plastic sliding pencil cases (staples, $1 or sale for $0.25), each case gets a full box of crayons in the beginning of the year. If a student finds a crayon on the floor, into the organizer it goes, cue student who lost that crayon realizing they have no red and gets one from the organizer.
You can read more about how this work here.
The caddy sits on top of a 3 drawer organizer at each table. The top drawer contains picture dictionaries, portable word walls, & a school box with scissors and glue, taken out only when needed.
If at anytime students need extra baggies, cards, glue, scissors, pencils, they simply get what they need from these containers. Every once in a while, I get a glue or eraser hoarder, but every system has its flaws. I'd rather fish out extra supplies once every few months than be interrupted during group time because Suzy needs another glue stick for her table. I try very hard to teach proper supply management throughout the year and it usually pays off in the form of respect & independent workers.
I used to have huge bins for students to turn in papers & I kept them in a corner...this led to huge stacks of papers being left alone forever & forgotten. Now I use these small bins & transfer papers to be graded, filed, and sent home very soon after they are turned in. My teaching style has changed a lot in five years & I do significantly less independent turn in style paperwork now, so this works great for me!
Nothing too fancy here, I keep my garbage can, recycle bin, & cleaning essentials in this area, our class restroom is directly to the left of the sink. {I need a cute mirror}
Past the restroom is the classroom library, MY FAVORITE PLACE in my classroom! I just love looking at this area! My awesome MIL helped me paper this whole wall over the summer to make it look more cohesive. Under all that paper, is a small awkward white board & an equally awkwardly placed bulletin board. To read more about how I organize my library,
click here, it looks different now, but the management is the same system!
I put theme or author study books here. I love themes but I also love doing author studies, I try to bring a balance of both! Either way, this is where they are displayed! The back side of the shelf contains past read alouds that students can reread or retell during morning arrival.
Book buddies go in this large basket, we use these during read to someone and sometimes read to self!
This tub is a total fun point in my classroom. The kids love to sit in it & read. I've used it as a behavior reward, just a reading station, but lately I have moved to letting kids work where they want. Not surpassingly at first, EVERYONE wants to be in the tub, but then some find they prefer to stand, sit at a desk, or lay on the floor. The tub becomes just another work place choice. To read more about how this tub came about,
click here.
Going past the library area, we have the back cabinets, which is one the places I display student work in the classroom, #amazingauthors anyone!? I love this.
Here is the display with student work on it, currently it has letters from last years students to my new firsties! Something to keep parents busy looking/reading during meet the teacher and a great way for my new students to learn a little bit about me too!
Here is the display from across the room! I love it! I laminated 12x12 cardstock and used sticky tak to attached the papers to the cabinets. I used pre glittered/painted black clothes pins to hold up art work, also attached with sticky tak! It held all year for me last year.
Passing the cabinets brings us to my teacher area! I always struggle to make this area look cohesive & simple because of the amount of things that are kept here and lack or matching furniture. Its one of the reasons I moved this area out from the doors "first look"! I use this cart to store extra copies, M-F work copies, things for filing & planning.
Here is a more expanded look of the area. I like to keep my guided reading table & my teacher desk together, it helps me to work more efficiently. I only have one computer for me & my students to share, so I bring my laptop and keep in on my desk in front of the window during the day. This allows me to easily check emails & take attendance in between working with students at my table.
On my desk, I keep the essentials!
Tape, stapler, post its, nurse passes, & of course my recess sunglasses! Ha!
For the supply addicts! I snagged this silverware holder (I think??) at hobby lobby on sale this summer!
All of my extra supplies that I keep on hand go on this shelf. Birthday pencils & my prize box on top. Markers, sharpies, anchor chart supplies, stamps, and office supplies on first shelf. Guided reading group boxes, assessment & data binders here too. The bottom row in my new student box, and file boxes for planning, sub tub, & random stuff that needs a temporary home!
This is my guided reading table, compete with Ikea stools & animal word helpers! I will put up different focus tools under the word helpers throughout the year.
I took this close up before I put down my dry erase stickers. I usually keep my data binder here along with a few pens & things for easy access for note taking.
Here is a close up on what one student has to work with at the table. its a small magnet board, magnetic letter tiles, a dry erase marker & an eraser. If I know we will be highlighting, I will add in a highlighter. Sometimes I place seasonally themed mini-pointers here too! It just depends what I have planned for groups.
Passing the teacher area into whole group.
Passing the group table you will see my listening center, I still need to grab some new 3M hooks for my headphones! To read more about the listening center, click here.
Above the listening center, is my ESL/ELL help posters, but really they are great for all students. I explicitly teach these one at a time in the beginning of the year, I keep them here, but I will take them down until I teach each one!
To check these out on TPT, click here.
Our anchor charts we make each day/week will go in this space while we are working on them & then be transferred to a more permeant location for reference throughout the year (shown later in tour).
This little area is for a weekly display that lines up with our objectives & I can statements. It is more of a visual display of skills & concepts for my firsties.
To see the full set, click here.
This is our mini-lesson/read aloud area. It is right in front of the focus board & white board area. See additional views below.
The white paper you see below the board is an area where we record books we read as a group & love!
The boxes with teal washi are for I can statements & objectives. Sentence stems for student response go under the skills & concepts posters. {Haven't does those yet}
Phonics & HFW displays & games will go into the black pocket chart. The 3 ways to read a book, is one of my first lessons, so its ready to go! This space will change & grow throughout the year to accommodate different lessons.
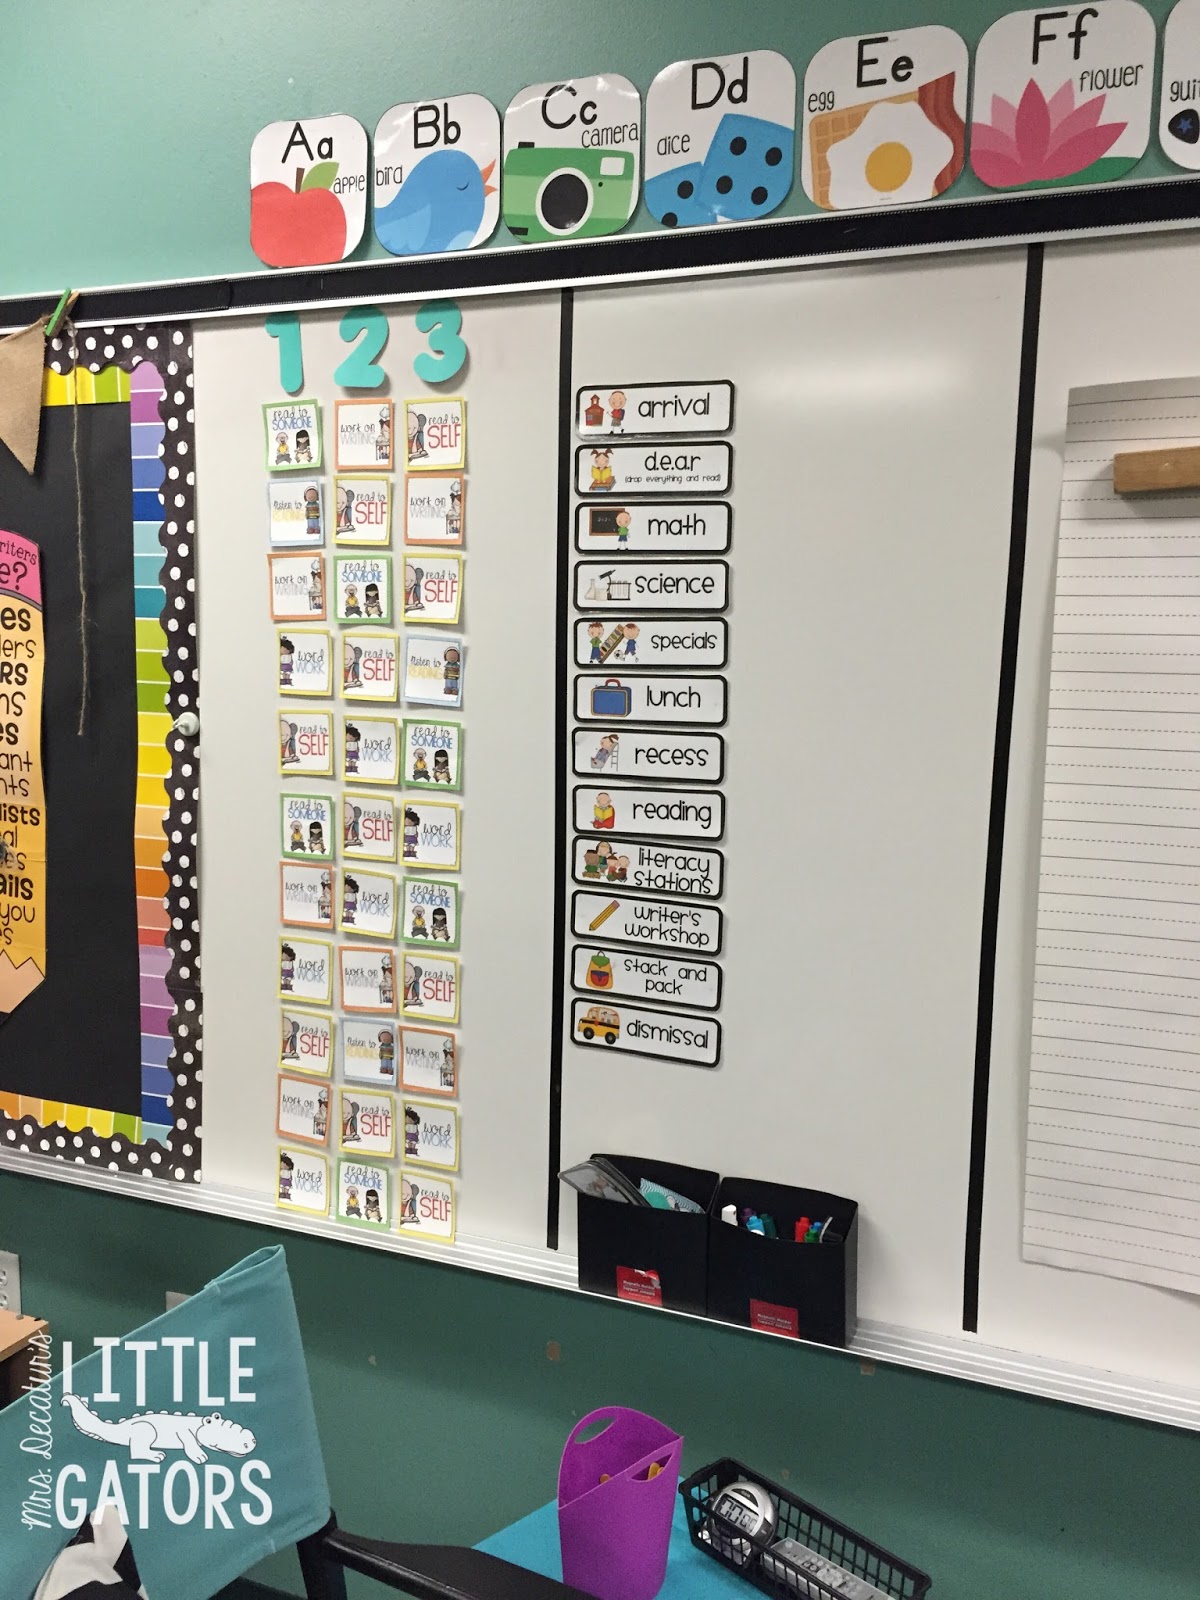
The schedule cards are magnetic, my school changes things up A LOT, and with events, PLC days, its great to be able to manipulate them around when needed. I also jot notes to myself and students in the blank area. The date goes up top! The 1,2,3 denotes our Daily 5 {in reality 3} rotations. I put the students names on small cards on either side (two classes, remember!) and move the D5 cards, not the names!
A more expanded view of the whole group area from across the room, you'll notice this was before I arranged my focus boards (sorry!)
I keep pointers for me & the students to use while doing lessons in the pink jar, popsicle sticks for random selection in the purple tub. The blue table is a goodwill find $7, its a telephone table, so it has a great space to store this weeks read alouds below! Flash cards, remotes, & timers on top!
Next to my chair is our easel, weekly poem on front, and our phonics name chart on back. I flip them around as needed. The books below are also for morning arrival time, students can read these and sit on the floor once they have unpacked. I have two locations for these to avoid pile ups, my students trickle in from 7:45-8:30, so this isn't a huge issue for me.
Another expanded view, before I finished the focus boards.
Behind my read aloud chair & easel is the writing center (remember the name chart faces this way most of the time ;) ) Students can grab clipboards, sit at the collaborative table, and get writer's workshop paper from this area.
I use Latoya Reed's "Let's Write About..." centers religiously. They are my favorite TPT find ever! The cup has sentence starters & vocabulary cards that can go to students' desks and back. The stand up display has the same words but stays at the collaborative center. Each time I switch out a writing unit, I put the vocabulary display sheet in a binder so the students can go back to the previous theme's words.
Behind my writing center are the computers. My students LOVE to take AR quizzes, my school has this amazing hallway long island display that they work toward moving their boats on to. I am hoping to get another computer & I think it may actually happen {fingers crossed}. My Elmo & teacher computer, and phone stay here. It doesn't bother me at all.

The polka dot poster & ribbon is for students to sign up to take a quiz. The two baskets in the green basket will have mini clothes pins with each students name. They simply pick up their clothes pin & put it on the ribbon in order. This worked like a charm last year, I establish when we can and cannot take quizzes throughout the day and they work down the list. The blue & pink large bins contain their AR/Library folders. We go to library as a 'special' to they take the folder to make sure they are selecting books on their level & not choosing a book a second time. It also has their computer passwords if they choose to go to the computer lab before the bell rings to quiz. Yellow posters are for 100's on quizzes. The black chart is a hall of fame type thing!
My school uses CHAMPS throughout the building I use this display to teach & remind students of appropriate behaviors in different settings. I will also be adding our class compliment jar to this board {when I get a chance}.
I have my phone, contact binder, a file to drop notes in, and a few pens in this area. I just jot down anything I need to in this area. I actually like having my contact log across from my desk, it keeps it NOT LOST. haha
This sad little area is student cubbies, directly to the left of the computer area. Its also where my anchor charts will find a more permanent home for reference, since it is only reading and social studies, I find that keeping them on clips to flip works well for me!
I keep student selected work for portfolios, I work on them though the year and display them for open house. We continue to add to them after open house (marchish) until the last week of school.
This is where I keep writing & art that students select as their best work, until I find time to fill them up (about once every two months).
On the end of the cubbies, are mail slots. My students each have a number but I cover the edges in washi tape so I can also sharpie on their names next to their numbers! Above the mail slots, I keep absent work to hand out the next day, things that come back from my teacher mail box at lunch or whatever other busy time that need to be filed, papers to grade, and a data file where I temp. toss things from or for meetings.
On the side of the cubbies hangs my hodge podge of hall passes! And that brings us full circle around my classroom!
Here are a few wide look views of my classroom:
I hope you enjoyed your peek into my classroom!